Download PDF
Download page Calibrate Internal Magnetometer.
Calibrate Internal Magnetometer
The purpose of this document is to guide on how to calibrate the magnetometers in the Ellipse with the sbgCenter, or with the on-board calibration tool using our RestAPI. If you need to integrate an external magnetometer instead, please check the External Magnetometer Integration page first.

Note: this video shows a slightly older version of the sbgCenter interface, some button layouts and labels have changed since. The calibration method and rotation technique shown remain accurate, refer to the written steps below for the current interface.
Why Is Magnetic Calibration Necessary
Ellipse magnetometers are calibrated at the factory. But once the Ellipse is mounted on your vehicle, it picks up magnetic interference from the materials around it: metal parts, screws, wiring, motors, and so on. This changes the magnetic field the sensor measures, and can cause heading errors of several tens of degrees if it is not corrected. Magnetic calibration fixes this problem.

Calibration environment
The calibration must be done with the Ellipse already mounted on the vehicle, in its final position. The goal of the calibration is to measure and correct the magnetic interference coming from that specific vehicle. Perform the calibration away from any magnetic disturbance that is not part of the vehicle itself, such as other vehicles, buildings, tools, or metal structures nearby. Keep at least 3 meters away from these external sources whenever possible.
Two types of interference affect the magnetic field:
- Hard iron: Caused by magnets, magnetized parts (screws, bolts), or high-current wiring. Adds a constant offset, independent of orientation.
- Soft iron: Caused by iron, steel, and other ferromagnetic materials, which distort the field direction itself and can rotate the measured heading by tens of degrees. Harder to correct than hard iron.
What can be corrected: Distortions that stay constant relative to the Ellipse can be corrected: fixed magnets, and the vehicle's own structure, such as its airframe or metal frame.
What cannot be corrected: Distortions that move or vary over time cannot be corrected, even when the source is physically mounted on the vehicle. This includes moving parts such as rotor blades, engines, and high current electric wires, Since the magnetic field they create can change. These sources cannot be calibrated out and should be kept as far as possible from the Ellipse.
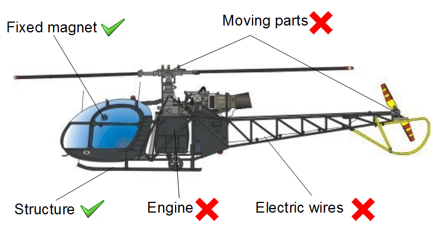
3D or 2D Calibration
The calibration works by measuring the local magnetic field by rotating the Ellipse. Two modes are available, depending on how freely the vehicle can be moved.

Before starting the calibration
It is important to note that doing the warm-up of the system (ie. alignment) before performing the calibration will give a better calibration because the internal sensors errors will be better estimated.
3D calibration
3D calibration provides the most robust and globally valid magnetic compensation. This is the recommended method and should be used whenever possible, since it gives the best results. Rotate the Ellipse slowly, making full circles back and forth across different orientations, rather than random movements.
Best way to do a 3D calibration
The best way to calibrate a magnetometer in 3D is to perform a 360° rotation around each of the 3 axis of the Ellipse (x, y and z) and then to put the system on each side (top, bottom, right side, left side, back front) and perform a 360° rotation around the vertical axis for each side.
2D calibration
2D calibration is easier to perform but relies more strongly on assumptions and extrapolation. This mode can be used when the Ellipse cannot be freely rotated in 3D, for example if it stays on a horizontal plane. In this case, rotate it through a full horizontal circle, back and forth, if possible. This mode still improves heading accuracy, but may show reduced performance when significant soft-iron distortion is present.
Performance may also degrade when operating in regions where the Earth magnetic field orientation, especially magnetic inclination, differs significantly from the calibration location. This effect is more likely to become noticeable when the installation has significant soft-iron distortion. If this is the case, we recommend to recalibrate the magnetometers in the new location.
The points acquired during the calibration should be within + or - 5 degrees of roll and pitch.
Initial date and position
In both cases, the calibration needs the sensor's position (latitude, longitude, altitude) and the date. This can be entered manually as initial parameters, or if a GNSS position is available during the calibration, the Ellipse will use that position and date automatically.
Calibration Methods
SBG Systems offers two ways to run a magnetic calibration, with similar performance. The right choice depends on your integration constraints.
- The sbgCenter method computes the calibration on the computer, using real time or previously recorded data. Since the computation runs on the computer, there is no limit on the number points used in the calibration.
- The on-board method computes the calibration directly on the Ellipse, triggered through the REST API or low level sbgECom commands. It does not need sbgCenter or an operator running it, commands can come from a simple script or be built into the vehicle's own system. Since the computation runs on the Ellipse itself, it is limited to 1000 points used for the calibration, though the device keeps only the most relevant ones, so results are not affected in practice.
Using sbgCenter
Setting an initial position and date
Before starting, set the Ellipse's initial position and date. In Settings, under Sensor > Initial Position & Date, enter these manually if no GNSS fix is available. This lets the sbgCenter compute the magnetic declination and match it against the on board World Magnetic Model.
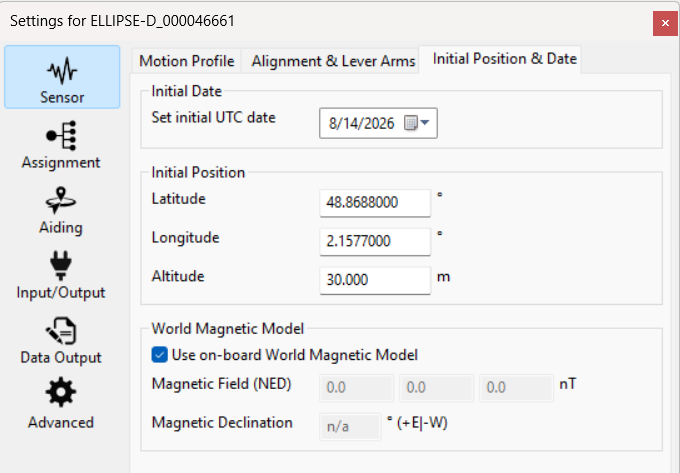
This is required when not using GNSS. When using GNSS the position and date can come from the GNSS and this initial position and date configuration is not required anymore.
Select Internal Magnetometer as Aiding
To set the magnetometer as an aiding, go to Settings > Assignment > Magnetometer and select Internal.
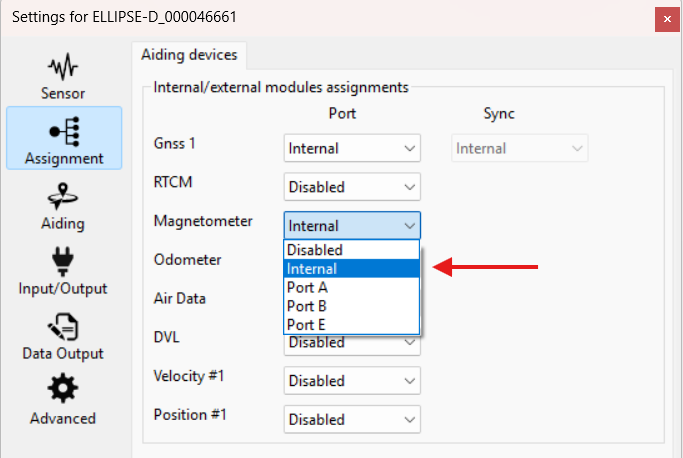
Starting the Calibration
To open the calibration tool, go to Settings > Aiding > Magnetometer and click Calibrate Magnetometers. This opens the Soft and Hard Iron calibration window. Also make sure in Aiding Rejection to select Automatic for Heading after the calibration to use the magnetometer in the Ellipse.
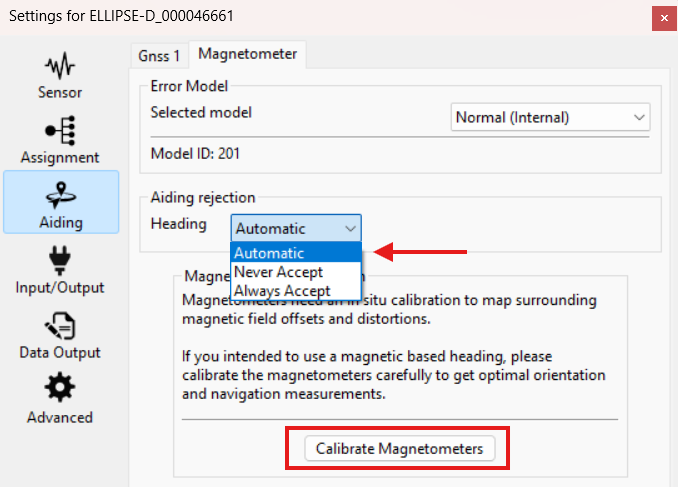
Procedure
Click Start acquisition.
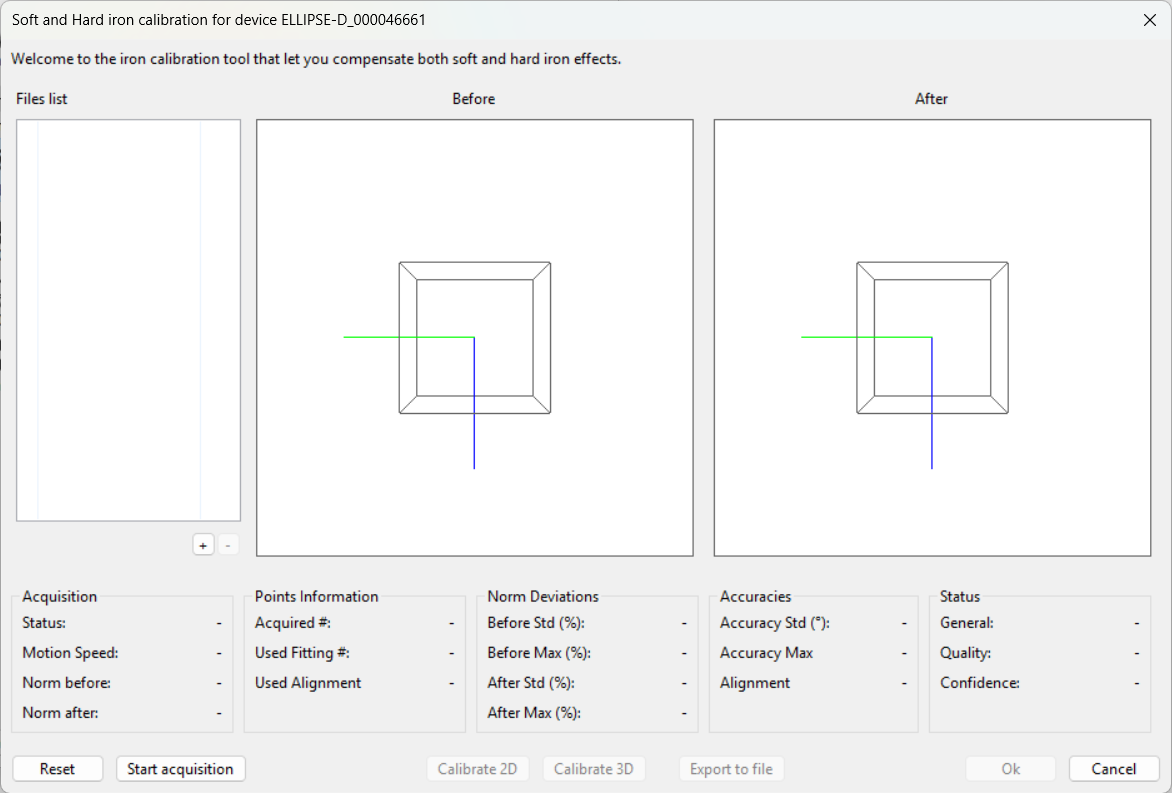
Rotate the Ellipse slowly through as many orientations as possible for a 3D calibration, or through a horizontal circle for a 2D calibration. Watch the Motion Speed status and keep it at Optimal.
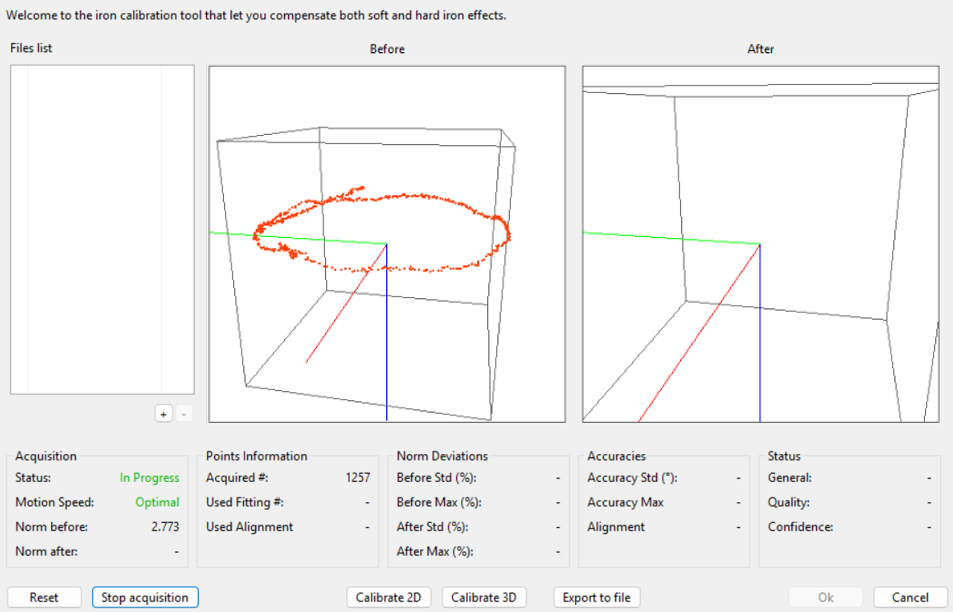
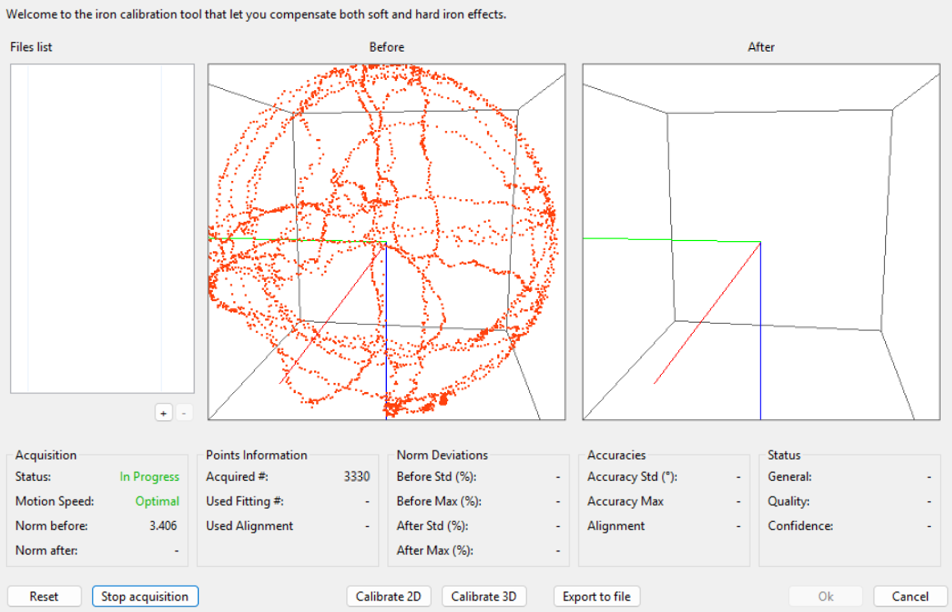
Once you have rotated through enough orientations, click Calibrate 2D or Calibrate 3D depending on the calibration you want.
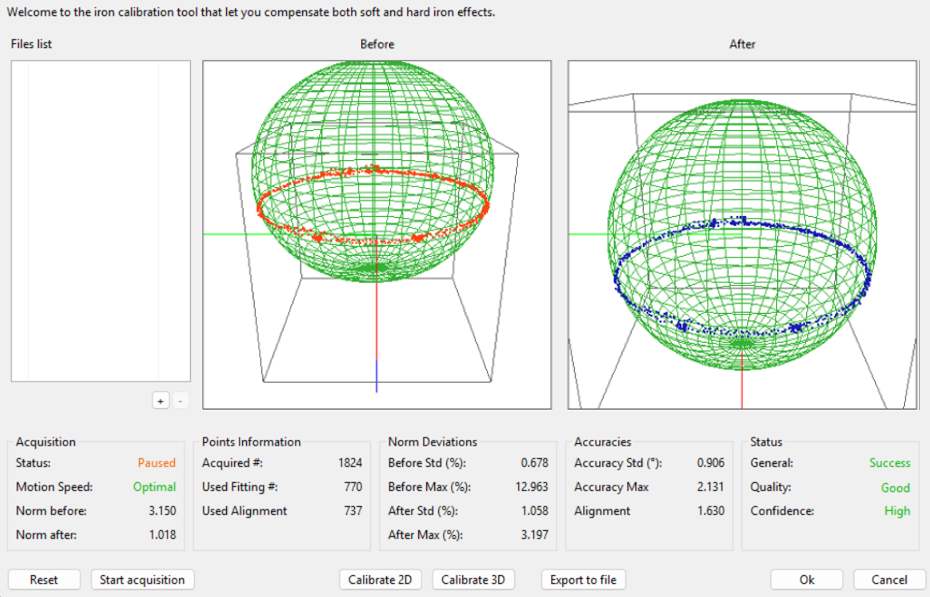
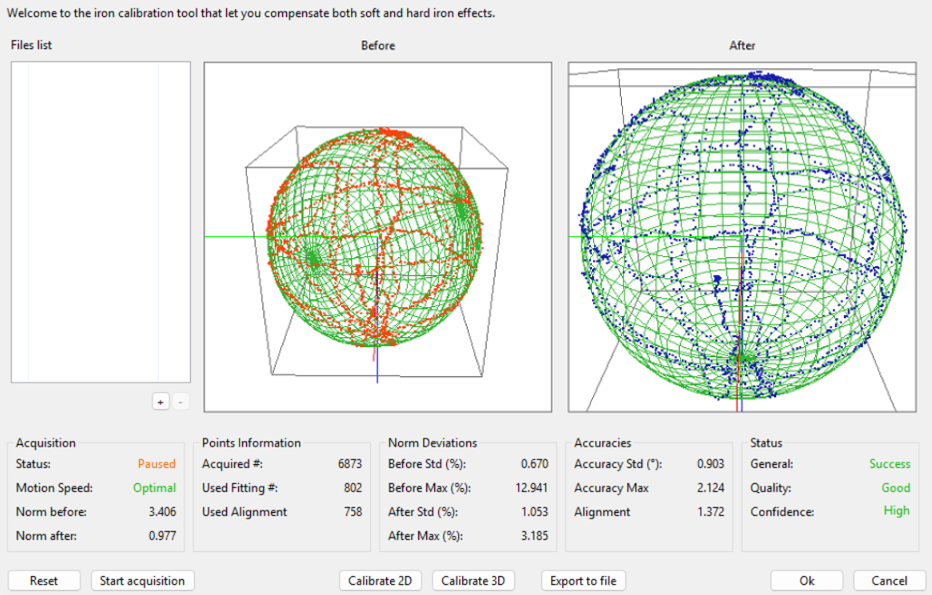
Check the results. The Status box shows Quality and Confidence, aim for a quality of Good or Optimal, with confidence at High or Medium.
Norm Deviations shows how far the field was from a perfect sphere before and after correction, lower After values are better.
Accuracies gives the expected heading accuracy in degrees, useful if your application needs a specific target, and Alignment reflects how well the magnetometer was aligned with the Ellipse's inertial frame.
If the results are not good enough, click Start acquisition again to keep collecting points, then Calibrate 2D or 3D again.
You can also not pause the acquisition, in this case clicking on Calibrate 2D or Calibrate 3D will use all the points since the start of the acquisition to compute the results.
Once satisfied, click Ok to send the calibration to the Ellipse or Export to file if you want to save it for a future calibration.
Click Reset at any point to discard the acquisition and start over.
On-Board using the REST API
It is possible to configure the Ellipse with the Configuration API (sbgInsRestApi). A simple way to use this API on a Windows/Linux/Mac OS X computer is to use the command line tool sbgEcomApi.exe, provided on GitHub.
You can calibrate the magnetometers using the Rest API by using a few commands. The sbgInsRestApi documentation will have all the commands available. The syntax below is for the Windows command line interface, the syntax might change when using different operating systems or command line interfaces.
There is no pause mode when using the on-board calibration tool.
Setting an initial position and date
The calibration needs a position and date to work properly, as explained earlier. If the Ellipse does not have a GNSS fix available, this can be entered manually before starting the calibration
sbgEComApi.exe -s <COM> -r <baudrate> /api/v1/settings/localParam -p -b "{\"latitude\":48.863611,\"longitude\":2.361388,\"height\":22,\"date\":\"2024-03-12\"}"
You will get this following message {"title":"request successful","needReboot":true}.
You will then need to save your settings and reboot the unit before starting the callibration by using those commands one by one.
sbgEComApi.exe -s <COM> -r <baudrate> /api/v1/settings/save -p
sbgEComApi.exe -s <COM> -r <baudrate> /api/v1/system/reboot -p
Starting the callibration
Choose either a 2D or 3D calibration mode when starting the acquisition, matching the mode you intend to perform.
sbgEComApi.exe -s <COM> -r <baudrate> /api/v1/magnetometer/calibration/start -p -b "{\"mode\":\"3d\"}"
You will get the following response: {"title":"request successful"} which means the calibration has started.
Computing and returning the results of a magnetic calibration
Rotate the Ellipse as described earlier (staying under 250°/s) , then request the calibration results:
sbgEComApi.exe -s <COM> -r <baudrate> /api/v1/magnetometer/calibration -g
"status":"success",
"quality":"optimal",
"trust":"high",
"maxNumPoints":1000,
"numPointsTotal":2886,
[...]
"hardIronCorrection":[-0.28149625658988953,0.081921949982643127,-0.22102254629135132],
"softIronCorrection":[0.87645494937896729,-0.033238697797060013,-0.010048907250165939,
                      -0.0034575869794934988,0.81990772485733032,-0.01065436378121376,
                       0.010949188843369484,-0.01831500418484211,0.80841606855392456],
[...]
Calibration results
Sending this command doesn't stop the calibration, it is still going in the background. You can send this command this multiple times until the results are satisfactory and you want to save them.
Aim for a quality of optimal, or at least good, with trust at high, before saving the calibration. If quality stays at poor or invalid and trust remains low or medium, keep rotating the Ellipse and repeat this command.
Setting the new calibration in the Ellipse
Once the results returned are satisfactory, you will need to set the calibration results to the Ellipse by sending the Hard Iron and Soft Iron corrections only in a JSON format before saving the settings.
sbgEComApi.exe -s <COM> -r <baudrate> /api/v1/settings/aiding/magnetometer -p -b "{\"hardIronCorrection\":[...],\"softIronCorrection\":[...]}"
Saving and Rebooting
New settings are only applied in volatile memory until they are saved, and a reboot is required for the calibration to take effect
sbgEComApi.exe -s <COM> -r <baudrate> /api/v1/settings/save -p
sbgEComApi.exe -s <COM> -r <baudrate> /api/v1/system/reboot -p
On-Board using Low Level Commands
On Ellipse v3 and HPI units, the same on-board calibration can also be triggered directly from your own application, using the low level sbgECom commands: sbgEComCmdMagStartCalib, sbgEComCmdMagComputeCalib, sbgEComCmdMagSetCalibData2, and sbgEComCmdSettingsAction to save the result to flash memory.
A complete working example covering this full sequence is available in the sbgECom GitHub repository, in examples/ellipseOnboardMagCalib/src/main.c