Download PDF
Download page Lever Arms Calibration Procedure.
Lever Arms Calibration Procedure
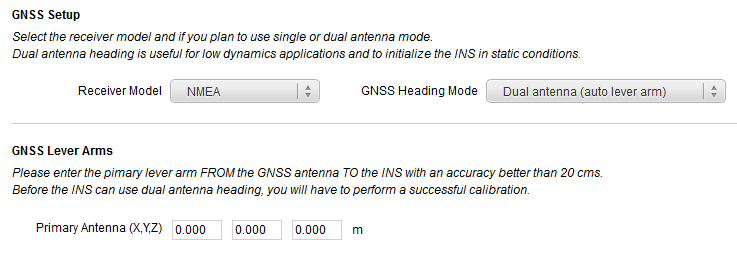
First step: define rough GNSS lever arms in configuration page
In the GNSS aiding settings, you have the possibility to select the GNSS heading mode between three options:
- Single antenna mode.
- Dual antenna mode (auto lever arm).
- Dual antenna mode (known lever arm).
In the first two options, only the primary GNSS antenna lever arm can be entered. The third option requests a user first guess for the secondary antenna lever arm.
Second step: Start the calibration
Before starting the calibration, it is recommended to place the vehicle in a good GNSS environment to enable best performance.
GNSS correction
The calibration procedure must be performed with high precision GNSS like PPP or RTK as it will provide faster results, with a better confidence.
Dual antenna alignment only
When calibrating only the dual antenna alignment (with the primary antenna lever arms already calibrated), then RTK or PPP accuracy is not required.
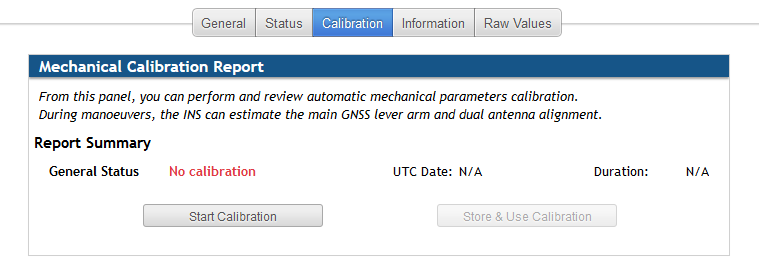
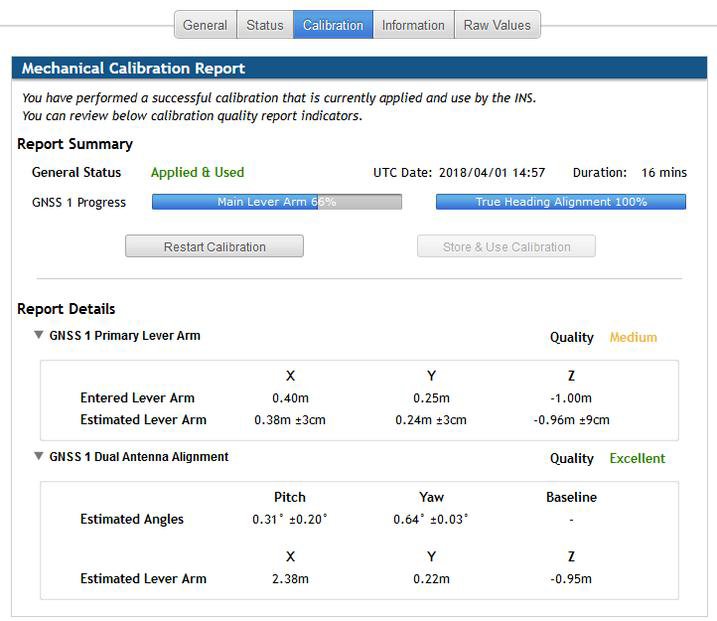
Third step: Running calibration and check progress
Once started, the calibration status will typically go into “Waiting” state. In order to actually run the calibration, we need to operate the Kalman filter in Full navigation mode, which means we need heading, and position resolved.
In case the setting “Auto lever arm” has been set, please note that the system will not be able to initialize the heading in static condition, so the EKF will transition to Full navigation only after a short period of motion in forward direction.
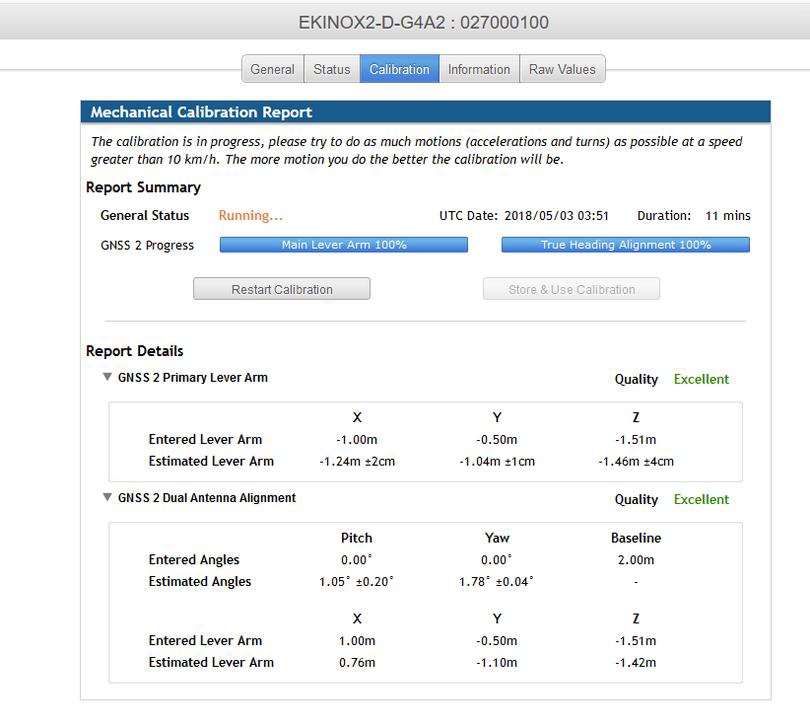
Once the calibration is started and the vehicle is operated at a sufficient speed (higher than 2.5m/s), the calibration status will transition to “running” mode. Two progress bars now display the calibration progress: one for the primary GNSS lever arm estimation, and one for the dual antenna heading alignment (linked to the secondary lever arm). The more dynamics we can get, the faster the calibration will be.
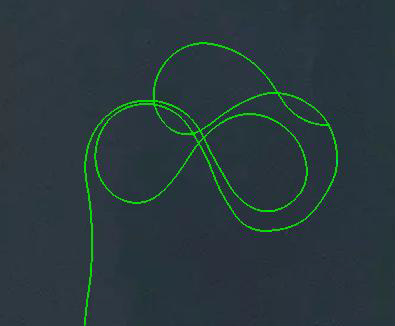
The typical recommendation is to perform high speed maneuvers, eight shape patterns, accelerations and deceleration phases. To get more advanced feedback on the performance of estimated parameters, the calibration page also displays the estimated lever arms and angles, in comparison to what you entered initially, with associated standard deviations.
Depending on the GNSS environment and precision (RTK or not) and vehicle dynamics, the calibration can be performed within a few minutes, or can take more than half an hour. In case of low dynamics it may be impossible to reach a 100% finished calibration.
Fourth step: Ending calibration
When active, the calibration continuously improves the lever arm and alignments. Even after reaching 100% completion, it is still possible to enhance the estimated values again by keeping maneuvering.
On the opposite side, in case of poor GNSS environment and/or low dynamics, it might be challenging/impossible to reach a 100% complete calibration.
That’s why in the end, it belongs to the user to decide when the calibration should be stopped. User should also verify the consistency of the estimated parameters with respect to the entered values and actual setup. A minimum of 20% completion on each estimated parameter is required to unlock the calibration ending.
Once the calibration results are satisfactory, user can click on “Store & Use Calibration” button. This action will not restart the Kalman filter and he can move on to the actual mission directly. At next start, the unit will automatically load calibrated lever arms.
In case of inconsistency between actual setup and estimated parameters, user has the possibility to:
- Try a new calibration from scratch by pressing “Restart Calibration”
- Enter rough estimate of secondary GNSS lever arm to help the calibration procedure; then restart the calibration.
Checking what is actually applied, clearing calibration data
In any case, the parameters applied in the navigation filter are the one displayed in the configuration panel that can be freely edited. In case the setup is changed – compared to the previously applied calibration – it is always possible to modify the settings and start a new calibration, based on the newly entered values.
The calibration page always reflect the report from last calibration performed. In the same time, it checks whether this calibration is consistent with currently applied settings, using status “Applied and used” or “Not used”.