Download PDF
Download page Network Configuration.
Network Configuration
This brief document guides you in the process of configuring a High-Performance INS to connect to a network.
High-Performance INS Ethernet interface
All our High-Performance INS products are embedded with a 100Mb/s Ethernet interface.
- Web page for configuration and real time visualization purpose
- Ethernet IPv4 setup using DHCP (default) or static IP mode
- 5x UDP or TCP/IP interfaces that can be used as additional bidirectional communication ports
- FTP server for datalogger access
- NTRIP client for easy RTK corrections input
- PTP / NTP time servers
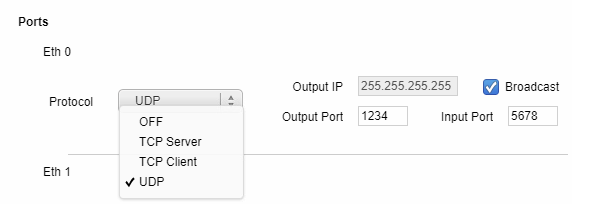
These are the protocol options to set up (up to 5) TCP/IP or UDP ports as follow (in Ethernet configuration menu):
- OFF
- TCP server
- TCP client, the 'output IP' is the target IP of the server
- UDP Broadcast, to whole loop (255.255.255.255)
- UDP the 'output IP' is the target IP that it is broadcasting to.
By Default, all High-Performance INS are in DHCP mode, and this is advisable to revert to DHCP mode when upgrading your High-Performance INS firmware.
The High-Performance INS is embedded a web interface which can be either accessed using the sbgCenter or directly from any modern web browser.
Be sure to have administrator privileges if you need to setup your computer's Network Interface Controller (NIC) configuration or else have your IT network manager assist you.
Network Considerations
It is advised to put the High-Performance INS behind a proper router/switch in order to be able to control its internet access (if needed). This will also separate the traffic when using heavy UDP broadcast clients (multibeam sonar or LiDAR) and will help manage several network segments with their specific routes/gateway.
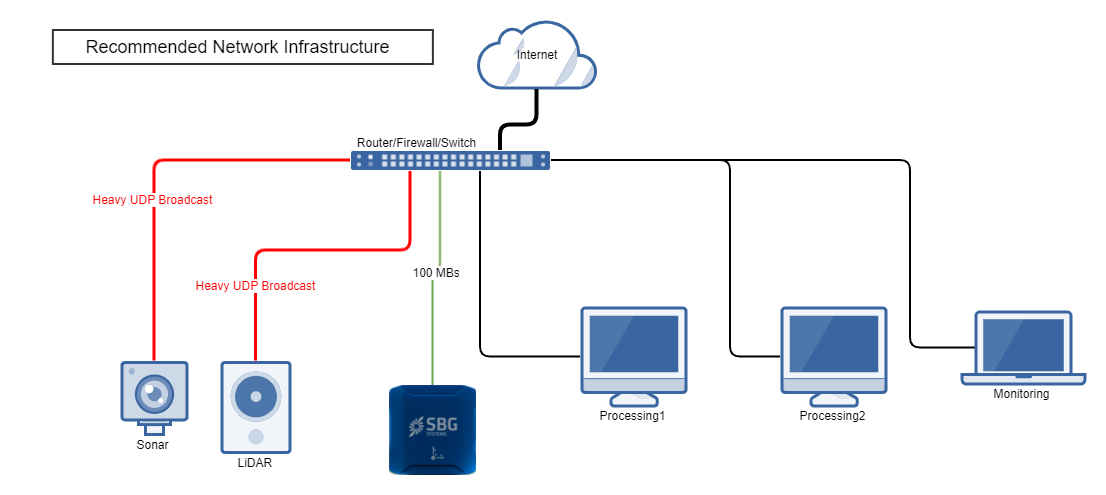
Heavy UDP broadcast traffic is known to cause High CPU load on High-Performance INS. This will tamper it’s operation (no PTP/sync device, slow web interface) and must be separated from High-Performance INS current network segment for best performance.
If you connect directly the High-Performance INS to a computer’s NIC, you will have to be in DHCP for the first connection to it’s web interface before being able to change to a fixed IP.
sbgCenter [windows only] can be used to help find the IP. Be sure to enable only the NIC with High-Performance INS on it (in the case you have several Network interface Cards or NIC ).
In the case where you have 2 NIC interfaces, one with internet access and one only in a local LAN ring for instruments only and would like to allow that local LAN access to internet, there is the following method available.
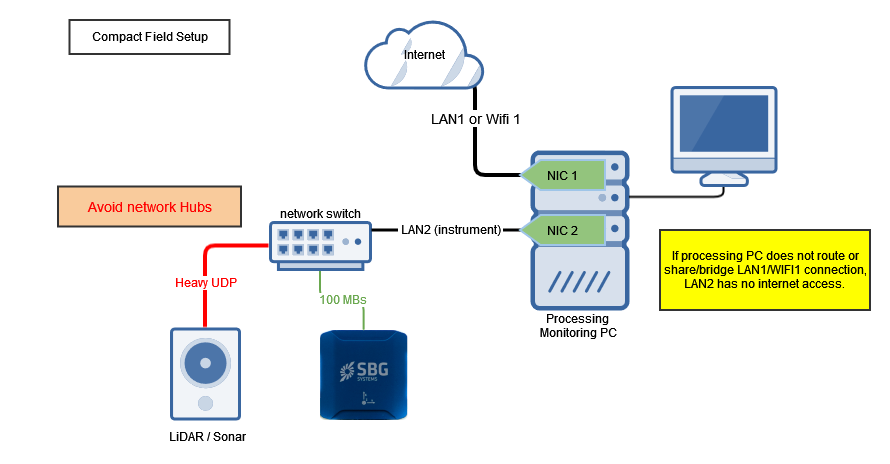
In Windows there are options to 'merge' 2 NIC’s network segments using Internet Connection Sharing ICS or Bridging in order to ‘route’ internet access from one to another:
- ICS is recommended with LAN2 + Wi-Fi1, where Wi-Fi1 is the primary NIC with internet access that needs to be shared with LAN2 (secondary NIC). The LAN2 will have to be in DHCP mode only.
- Bridging is recommended with LAN1 + LAN2, where LAN1 is the primary NIC with internet access that needs to be shared with LAN2 (secondary NIC). The LAN2 will have to be in DHCP mode only.
If you want a Fixed IP for LAN1 and also for LAN2, you will have to use some 3rd party software to be able to route of traffic from LAN2 to LAN1. Linux has indeed many built-in options for that.
High-Performance INS network interface setup
Connecting to a network with a DHCP server
In DHCP mode, if you do not know the High-Performance INS’s IP, it can be connected using the following URL’s
where ‘xxxxxxxxx’ is the unit serial number.
| http://ekinox_xxxxxxxxx.local/ | for EKINOX series. |
| http://apogee_xxxxxxxxx.local/ | for all APOGEE series. |
| http://navsight_xxxxxxxxx.local / | for all NAVSIGHT series. |
| http://quanta_xxxxxxxxx.local/ | for all QUANTA series. |
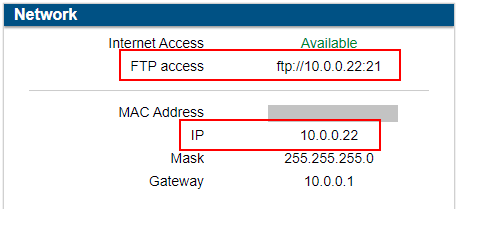
For FTP connection you will need to know the IP. The network information are shown in the Information tab below.
If you plan to change the network settings of the High-Performance INS, do take notes/records of old and new configuration.
- Change High-Performance INS setting first, save will make it reset and so you will not see it anymore.
- Update your computer’s network adapter to match the INS network ID, so you can access the High-Performance INS again (to the new address).
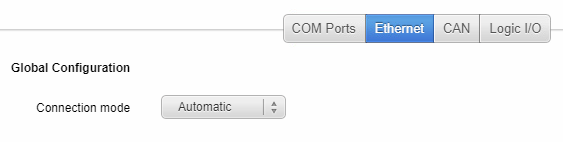
To setup the network, click on Configuration then in Inputs/Outputs -> tab Ethernet in Global configuration :
Connection mode : Automatic is for DHCP mode (default).
All is setup for you automatically.
Please also note that in DHCP mode, the IP address can change at expiration/renewal of DHCP lease. Unless you setup the DHCP server to reserve the same IP number according to the High-Performance INS Mac Address. (A Reserved IP can be requested to your network administrator), this can be useful to have a reserved (fixed) IP when setting other system to access the High-Performance INS’s data on a network with a DHCP server.
Connection mode : Static for a fixed IP.
You need to enter the IP address, a subnet mask, a gateway and DNS’s.
When you save, the interface resets and you need to update the URL http://xxx.xxx.xxx.xxx
(Where xxx.xxx.xxx.xxx is the current IP of your High-Performance INS) to reconnect the browser to the interface.
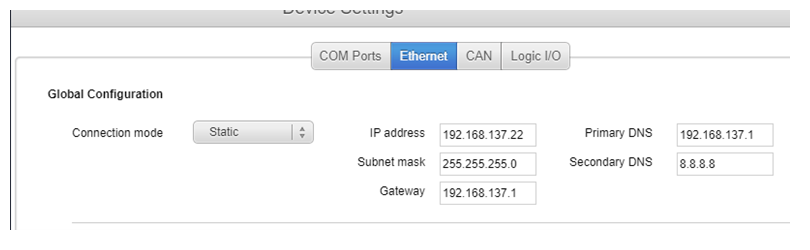
When saving the configuration, the High-Performance INS will reset itself.
Connecting INS directly to a computer's Ethernet NIC
Connecting the High-Performance INS directly to a computer Ethernet NIC is possible. If the High-Performance INS was setup in DHCP automatic mode and it does not detect any DHCP server, the High-Performance INS will use the last good IP that was assigned to it.
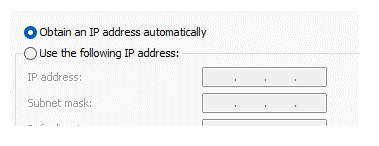
In the case you do not know the High-Performance INS IP configuration, you must first setup your computer's NIC to DCHP.
In this example High-Performance INS is connected directly to NIC Ethernet 6 (in windows 10/11).
Control Panel -> Network and Internet -> Network connection [Network adapters option]
If you right click and select status on an existing connection, then click details.
Open the Ethernet adapter properties and change it's IPv4 setting to DHCP.
Then press OK twice.
Then it will take a little longer for the network adapter to identify the network (a minute or 2).
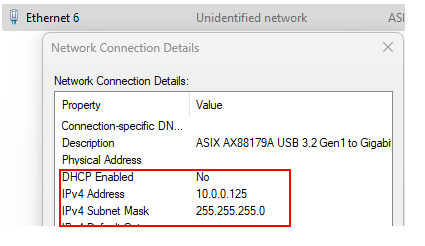
Ultimately the network adapter will assign itself an IP in APIPA mode and display 'Unidentified Network'.

Automatic Private IP Addressing (APIPA) is a DHCP fail-safe that protects a computer system from failure. It invokes a standby mechanism for local Internet Protocol version 4 (IPv4) networks supported by Microsoft Windows. When the DHCP process fails, Windows automatically assigns an IP address from the private range, which is 169.254.0.1 to 169.254.254.255. aka Network ID is 169.254.0.0.
Once you see unidentified network, you can look at the connection details by right click → Status → Details.

Open sbgCenter and try to scan the traffic on network interfaces.
If it is not detected and you have more NICs on the computer (Wi-Fi adapter or other Ethernet interfaces) you may want to disable them and try to scan again.

You see it’s in 10.0.0.9, but you still cannot access it in the web browser because your network adapter has the APIPA network ID 169.254.0.0.
You need to setup your network adapter to match the High-Performance INS’s network ID. sbgNetworkDiag will also fail until the network ID’s match.
Changing the IP of the computer network adapter (here 10.0.0.125) to match the High-Performance INS network ID 10.0.0.0 . The subnet mask value has to match the one you entered in the INS settings (255.255.255.0).
Press OK twice (to save and apply new settings).

Let the network refresh itself and check the status.
Now you can connect the High-Performance INS in the browser using the following URL : http://10.0.0.9
Because this Ethernet NIC is directly connected to the High-Performance INS, it does not have internet access unless you provide a gateway and DNS and a routing service to the NIC having an internet access.
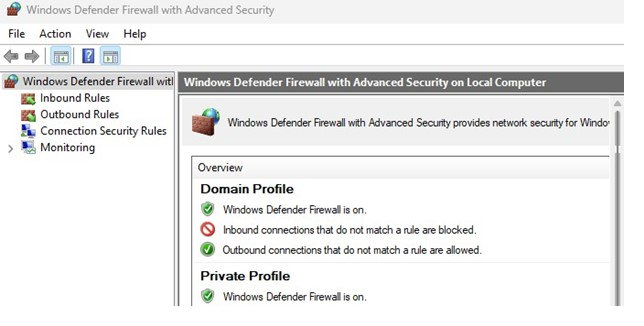
Firewall : Checking the rules
Firewall may have some default setup that impact the network traffic differently. E.g. you can ping a device or see it’s web page but not received it’s UDP traffic.
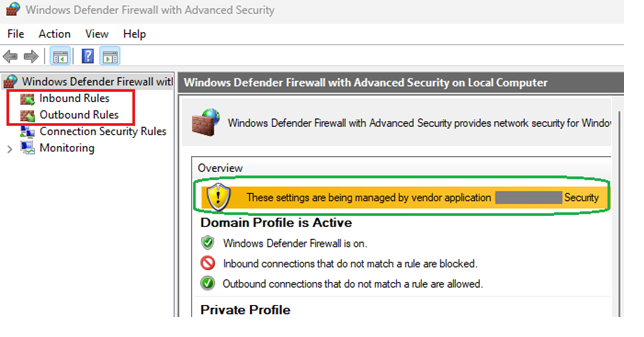
On Windows10/11 : Windows Defender Firewall is the OS embedded firewall, but it’s setting might be managed or overruled by an additional vendor’s Anti-Virus/Firewall software.
You need to check and eventually add/modify rules in inbound and outbound traffic in its specific interface too.
Watch for vendor security suite : In the case below, you may also need to check and eventually create rules on the third-party security software.
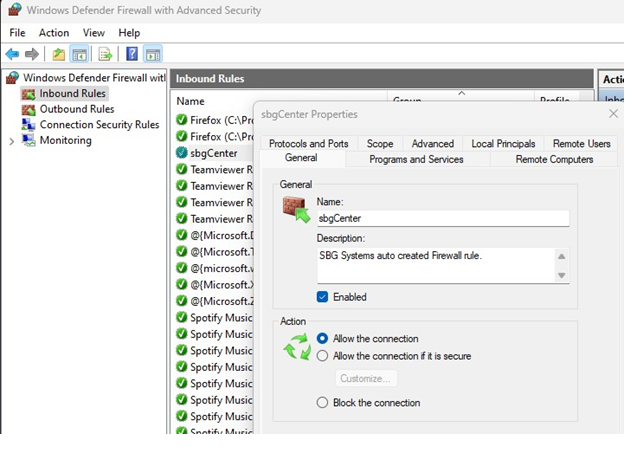
Below for sbgCenter rules (was created at installation of SDK, but can later be modified) when you want to see real-time data from your HPI (via ETH0 UDP broadcasting default settings on top of page)
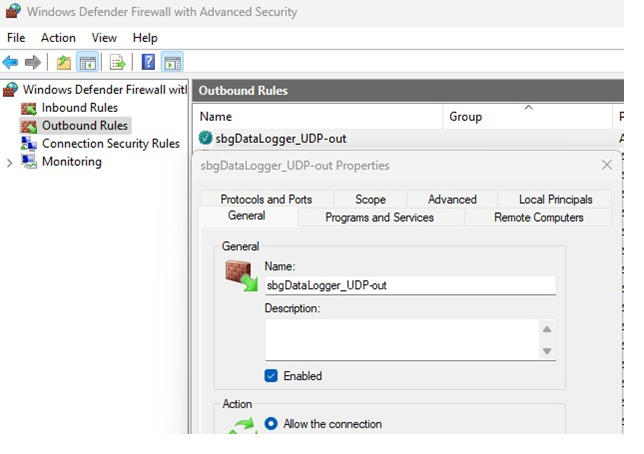
You may have to allow UDP inbound/outbound for sbgDataLogger if you use it to forward Ntrip correction via UDP
Linux : Checking Network configuration and firewall.
On modern linux distribution, there are multiple GUI to manage network configuration, ethernet or wifi, DNS, on the various NIC (devices). It come become handy also to check via a terminal in CLI. The below example are for Ubuntu 22.04.
Linux Network connection information
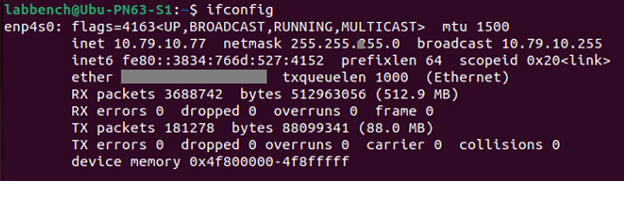
The command ifconfig will list the network devices and their IP addresses.
The device anp4s0 is an ethernet adapter, we see it's IP / subnet mask.
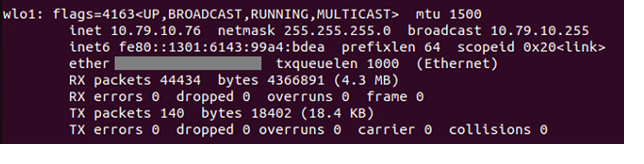
The device below is a wifi adapter.
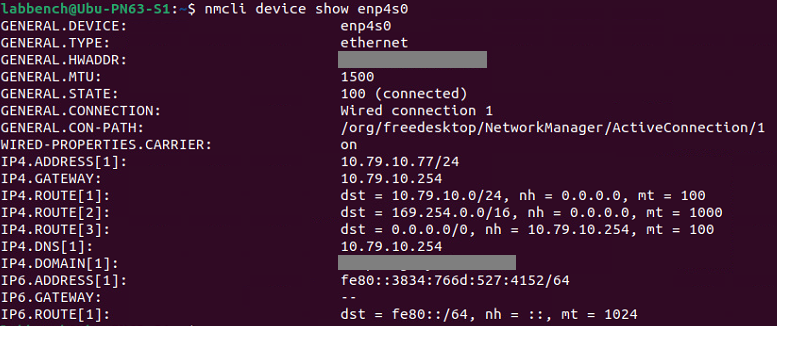
The command nmcli will show more network information on each device (DNS, gateway etc..)
nmcli device show <interfacename>
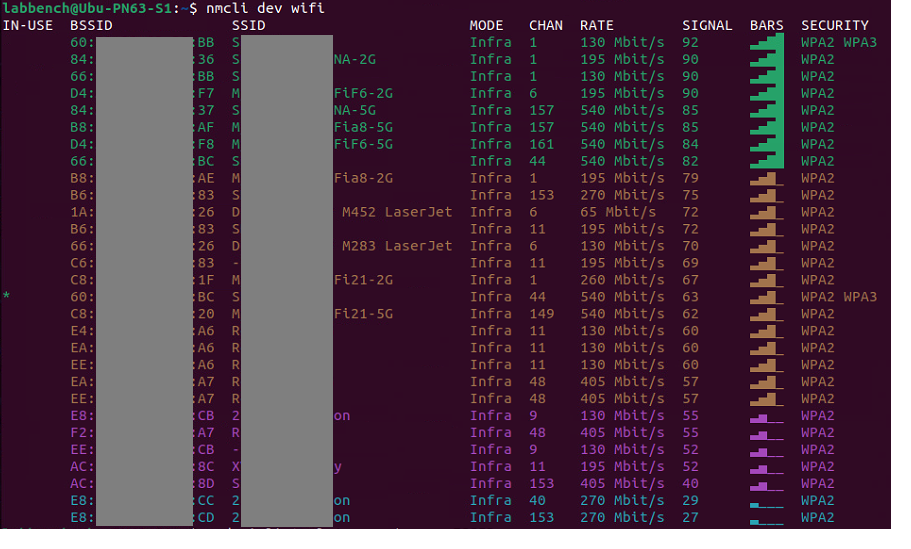
or scan for nearby wifi
nmcli dev wifi
Linux Firewall status & Configuration
The default firewall is iptables, but it is tedious to setup, Uncomplicated Firewall is commonly used and is easier to manage iptables.
To install ufw and gufw (needs elevated privileges):
sudo apt install -y gufw
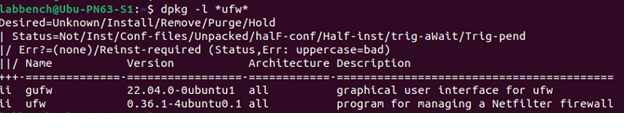
To check if it is installed: (installed starts with 'ii')
dpkg -l *ufw*
It is by default disabled, you need to enable ufw in GUI (switch 'status' or command line
sudo ufw enable
To check the status on GUI, and then list the rules . You can add/modify rules.

To check the status with CLI sudo ufw status verbose
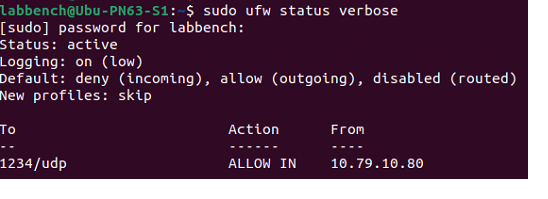
Above shows that a rule was added to allow UPD inbound from 10.19.10.80 on port 1234
Remember
UDP broadcast is not IP multicast, it will not forward from one subnet to another subnet (it needs advanced setup on a router), it is easier to place source and destination of UDP traffic on the same networkID.