Download PDF
Download page Interface specifications.
Interface specifications
Connectors overview
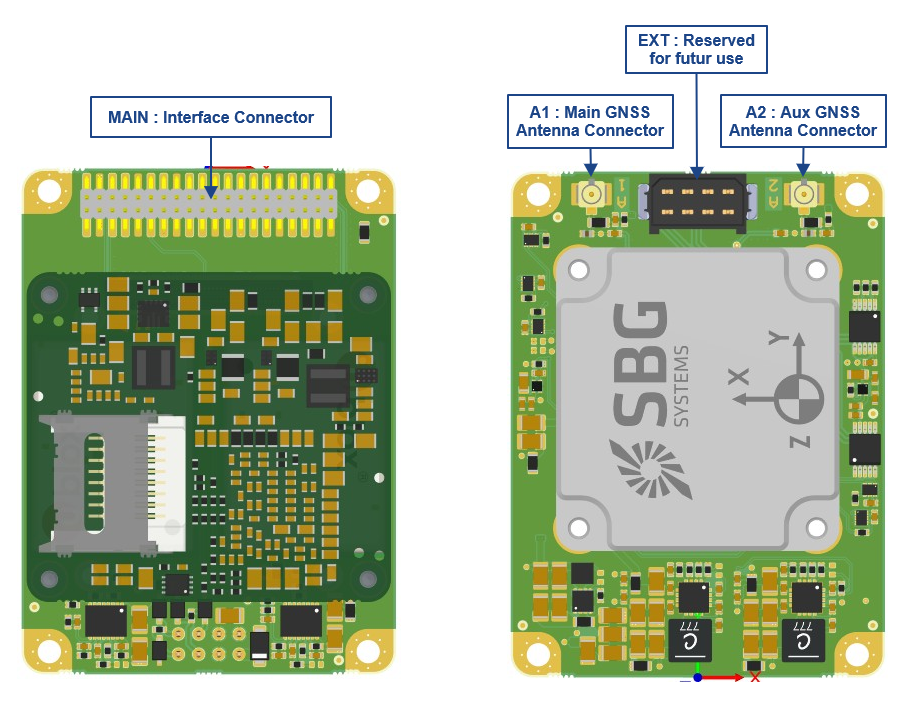
MAIN Connector
Onboard Connector
| Manufacturer | Manufacturer P/N | Description |
|---|---|---|
| ANTELEC | AM2D-127-40-4.0-3.0-G-CMS-H25 | Connector, Male, Vertical, 40 cts, 1.27mm pitch, SMD |
Note
SBG Systems could use other connectors while maintaining the correct match with the corresponding connectors listed above.
Mating Connectors
SBG Systems recommend the following connectors :
| Manufacturer | Manufacturer P/N | Description |
|---|---|---|
| ANTELEC | AF2D-127-40-G-CMS-H4 | Connector, Female, Vertical, 40 cts, 1.27mm pitch, SMD |
| AMPHENOL | 20021321-00040T4LF | Connector, Female, Vertical, 40 cts, 1.27mm pitch, SMD |
| AMPHENOL | 20021311-00040T4LF | Connector, Female, Vertical, 40 cts, 1.27mm pitch, TH |
Pin out table
Note
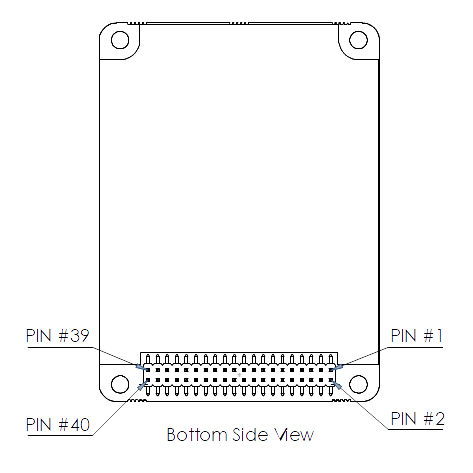
The pin numbering may not be the same as the one used by the connector manufacturer. Please refer to SBG provided pin numbering (in drawings)
Note
All Synchronization inputs and outputs, as well as odometer input pins have inverted polarity when compared to the firmware documentation, web page configuration and API web interface.
The “Rising edge” configuration, in the web page, firmware, and API web interface, will be in fact triggered on the falling edge at hardware level. This is because these inputs and outputs have been optimized for direct interfacing to a RS-232 receiver or driver, which can enable robust and safe connection to remote equipment.
An external inverting buffer can also be used to maintain LVTTL levels while putting back the signals to the same polarity as the firmware.
| Contact # | Signal Name | Type | Description | Connection Tips |
|---|---|---|---|---|
| 1 | VDD | Power Input | Main Power Supply Input | Both VDD pins (Pin#1 and Pin#2) must be tied together. |
| 2 | VDD | Power Input | Main Power Supply Input | Both VDD pins (Pin#1 and Pin#2) must be tied together. |
| 3 | GND | Ground | Signal Voltage Reference | All ground pins must be connected. |
| 4 | GND | Ground | Signal Voltage Reference | All ground pins must be connected. |
| 5 | ETHERNET_PORT_RX+ | Ethernet Input | Ethernet Port Receive Signal (+ differential) | Leave unconnected if not used. |
| 6 | ETHERNET_PORT_TX+ | Ethernet Output | Ethernet Port Transmit Signal (+ differential) | Leave unconnected if not used. |
| 7 | ETHERNET_PORT_RX- | Ethernet Input | Ethernet Port Receive Signal (- differential) | Leave unconnected if not used. |
| 8 | ETHERNET_PORT_TX- | Ethernet Output | Ethernet Port Transmit Signal (- differential) | Leave unconnected if not used. |
| 9 | GND | Ground | Signal Voltage Reference | All ground pins must be connected. |
| 10 | GND | Ground | Signal Voltage Reference | All ground pins must be connected. |
| 11 | INS_LED_A | LVTTL Output | INS Led Output A | Leave unconnected if not used. |
| 12 | GNSS_LED_A | LVTTL Output | GNSS Led Output A | Leave unconnected if not used. |
| 13 | INS_LED_B | LVTTL Output | INS Led Output B | Leave unconnected if not used. |
| 14 | GNSS_LED_B | LVTTL Output | GNSS Led Output B | Leave unconnected if not used. |
| 15 | GND | Ground | Signal Voltage Reference | All ground pins must be connected. |
| 16 | GND | Ground | Signal Voltage Reference | All ground pins must be connected. |
| 17 | CAN_TX | LVTTL Output | CAN Transmit | Leave unconnected if not used. |
| 18 | PORTA_TX | LVTTL Output | PORTA UART Transmit | Leave unconnected if not used. |
| 19 | CAN_RX | LVTTL Input | CAN Receive | Leave unconnected if not used. |
| 20 | PORTA_RX | LVTTL Input | PORTA UART Receive | Leave unconnected or tie to LVTTL High level if not used. |
| 21 | GND | Ground | Signal Voltage Reference | All ground pins must be connected. |
| 22 | SYNC IN A | LVTTL Input | Synchronization Input A | Leave unconnected if not used. |
| 23 | SYNC OUT B | LVTTL Output | Synchronization Output B | Leave unconnected if not used. |
| 24 | SYNC OUT A | LVTTL Output | Synchronization Output A | Leave unconnected if not used. |
| 25 | PORTC_TX | LVTTL Output | PORTC UART Transmit | Leave unconnected if not used. |
| 26 | PORTB_TX | LVTTL Output | PORTB UART Transmit | Leave unconnected if not used. |
| 27 | PORTC_RX | LVTTL Input | PORTC UART Receive | Leave unconnected or tie to LVTTL High level if not used. |
| 28 | PORTB_RX | LVTTL Input | PORTB UART Receive | Leave unconnected or tie to LVTTL High level if not used. |
| 29 | SYNC IN C | LVTTL Input | Synchronization Input C | Leave unconnected if not used. |
| 30 | SYNC IN B | LVTTL Input | Synchronization Input B | Leave unconnected if not used. |
| 31 | GND | Ground | Signal Voltage Reference | All ground pins must be connected. |
| 32 | GND | Ground | Signal Voltage Reference | All ground pins must be connected. |
| 33 | - | - | Reserved | Leave unconnected |
| 34 | - | - | Reserved | Leave unconnected |
| 35 | - | - | Reserved | Leave unconnected |
| 36 | ODO_A | LVTTL Input | Odometer A Channel | Leave unconnected if not used. |
| 37 | SYNC IN D | LVTTL Input | Synchronization Input D | Leave unconnected if not used. |
| 38 | ODO_B | LVTTL Input | Odometer B Channel | Leave unconnected if not used. |
| 39 | GND | Ground | Signal Voltage Reference | All ground pins must be connected. |
| 40 | GND | Ground | Signal Voltage Reference | All ground pins must be connected. |
EXT Connector
Reserved for future use
GNSS Antennas Connectors
U.FL series has become a standard in the wireless industry. It provides an extremely small mounting area weight, offers high frequency performance and has a user friendly tactile lock feeling that ensures a reliable connection.
- A1: Primary GNSS antenna, used for positioning
- A2: Secondary or Auxiliary GNSS antenna, used for dual antenna heading computation. When the dynamics are high enough like UAV applications, the secondary antenna is optional.
Onboard Connector
| Manufacturer | Manufacturer P/N | Description |
|---|---|---|
| AMPHENOL | A-1JB | Connector, UMCC, Jack, Vertical, 50ohm, SMD |
Note
SBG Systems could use other connectors while maintaining the correct match with the corresponding connectors listed above.
Mating Connectors
All UMCC (Ultra Miniature Coax Connectors) plugs are compatible :
- U.FL from HIROSE
- AMC (Amphenol Micro Coaxial) from AMPHENOL
- MHF from IPEX
- MCRF ( Micro Coaxial RF ) from MOLEX
Mounting
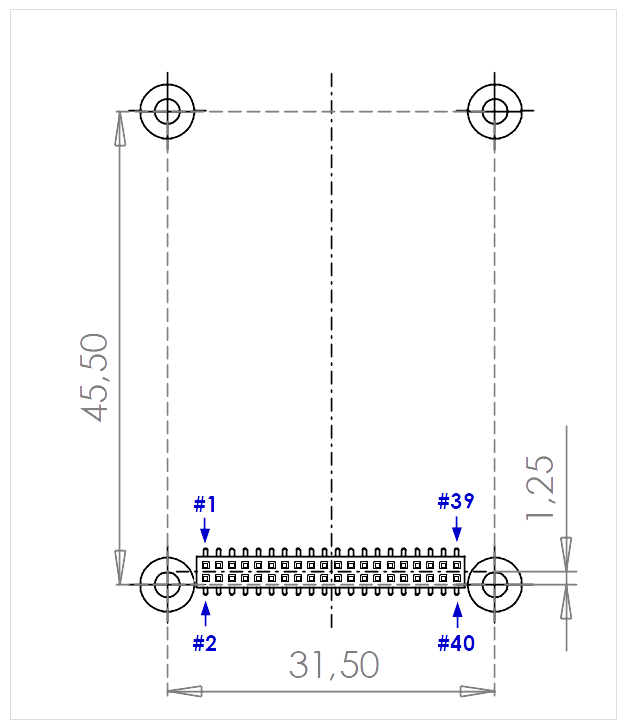
PCB Footprint (top view)
Note
The pin numbering may not be the same as the one used by the connector manufacturer. Please refer to SBG provided pin numbering (in drawings)
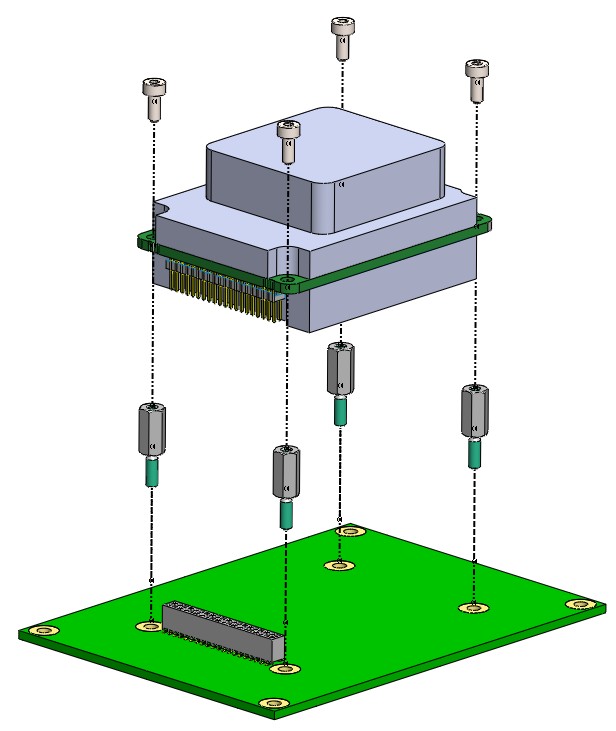
Mounting solutions
Mounting Screws
Quanta-Micro features 4x Ø 2.6 +/- 0.1 mm Mounting Holes for M2 Thread size standard screws.
The product is designed for direct mounting on a printed circuit board (PCB) and does not provide by itself any mechanical protection.
The integrator is responsible for proper mechanical protection (e.g. integration in an enclosure), in accordance to the end user application requirements.
It shall not be mounted on a wall above 2meters.
There are two recommended ways in which the product can be secured to the PCB.
Using Board mounted threaded standoffs
| Manufacturer | Manufacturer P/N | Description | Qty |
|---|---|---|---|
| Wurth Elektronik | 9774080243 | Spacer, M2 Threaded, 8 mm length., for 1.5mm PCB thickness, SMD | 4 |
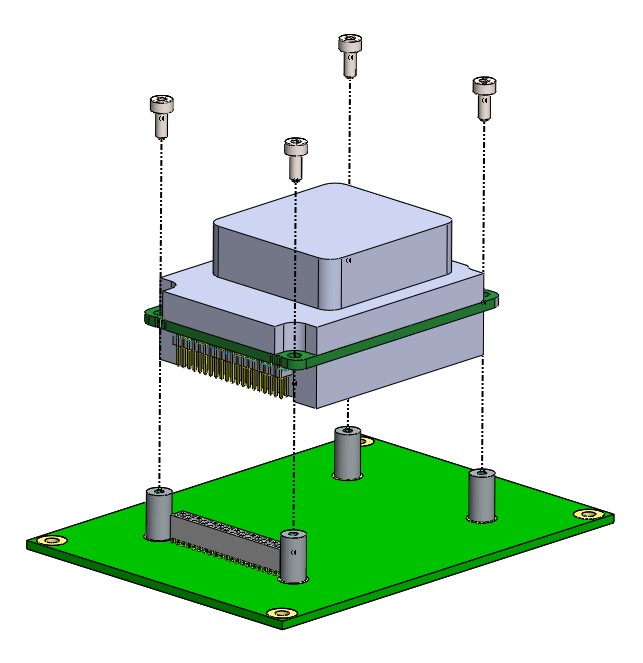
Using Spacer and Nuts
| Manufacturer | Manufacturer P/N | Description | Qty |
|---|---|---|---|
| Wurth Elektronik | 971080244 | Standoff, Hex, Male/Female, 8 mm length, F=M2x5, M=M2x5, Hex/SW 4mm, Brass, Nickel Plated | 4 |
| Ettinger | 005.10.085 |
Interfaces functional specifications
Serial and TCP/UDP interfaces
Quanta Micro integrates 3x serial UART interfaces as well as 5x TCP or UDP interfaces that can be used in a similar way. These interfaces can be used for configuration, data output and interfacing with third party equipment.
The following table summarizes the capabilities of each serial interface.
| PORT A | PORT B-C | ETH 0 | ETH 1-4 | |
|---|---|---|---|---|
| Configuration API | ● | ● | ||
| Data output | ● | ● | ● | ● |
| RTCM input | ● | ● | ● | ● |
| External GNSS / DVL input | ● | ● | ● | ● |
Supported protocols
Quanta Micro has been designed to be connected to a large range of aiding equipment. In addition to the native sbgECom binary protocol, other third party or standard protocols are also supported such as:
- NMEA
- RTCM
- TSS1
- Septentrio SBF
- Novatel Binary protocol
- Trimble GNSS protocol
- Third party ASCII outputs
For more information about protocols descriptions, please refer to the Firmware documentation.
Ethernet interface
The Ethernet interface brings various key functionalities to the Quanta Micro.
- Web page for configuration and real time visualization purpose
- 5x UDP / TCP/IP interfaces that can be used as additional bidirectional communication interfaces
- FTP server for datalogger access
- NTRIP client for easy RTK corrections input
- PTP / NTP time servers
Odometer integration
Odometers should be connected on ODO_A and ODO_B input signals.
Synchronization input and output
Sync In pins can be used to trigger external events and input external PPS information.
Sync Out A and B pins can be configured in the following modes :
- Main loop divider: This event is activated at the sensor sample time, but its frequency is divided by the output divider. If the divider is set to 4, pulse output frequency will be 200Hz / 4 = 50Hz.
- PPS: This simple output is synchronized with each top of UTC seconds. Validity should be checked by parsing the UTC messages status.
- Virtual odometer: This output generates a pulse each X meters of travel, depending on user configuration