This brief document guides you in the process of configuring the internal GNSS receiver for your High Performance SBG INS products that have an embedded GNSS receiver.
Use this document in complement of the “Operations” Operating Handbooks.
Step 1 : INS configuration
In order to configure the INS, you need to connect to the Web interface and open the configuration window. Simply follow those instructions:
Set aiding assignment
In this window, you just indicate Select the Internal option for the GPS 1 source, and it will automatically select the internal PPS.
If you have two connected GNSS receivers, only the primary GNSS receiver should provide a PPS source to accurately time stamp the data.
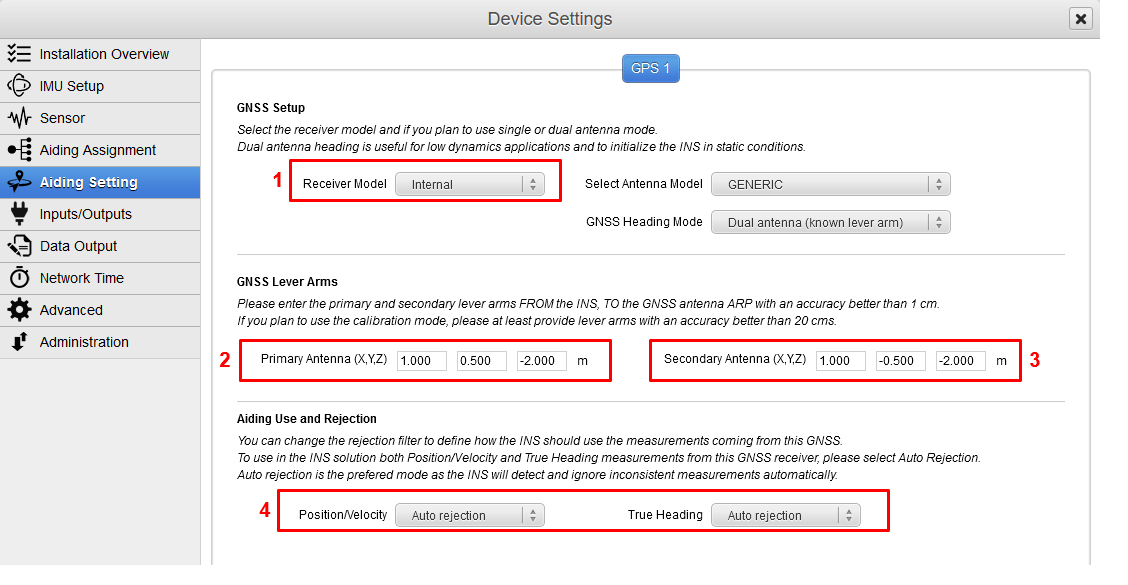
Set correct GNSS model and configuration
GNSS model should be set to Internal by default and cannot be changed when selecting the internal GNSS receiver in the Aiding Assignment window.
GNSS Primary lever arm has to be entered within a 1 cm accuracy FROM the IMU reference point, TO the antenna reference point (ARP), in the vehicle frame.
In Dual Antenna (known lever arm) mode, offset for the secondary antenna (providing heading) must also be entered, FROM the IMU reference point, TO each antenna reference point. It is also possible to select Dual Antenna (auto lever arm) if a calibration is planned for the antennas lever arms.
Finally, each available measurement (position/velocity and true heading if available) should be configured to be used or not. Auto rejection mode is recommended.
In order to increase the precision of the measurements it is recommended to select the actual Antenna model from the droplist. If you don't know what model to choose, you can select "Generic". In that case, the measured lever arms should refer to your antenna phase center (APC). When using an external GNSS receiver, it is highly recommended to have the same antenna model selected on the GNSS receiver and the INS settings.