Download PDF
Download page Magnetometer Integration.
Magnetometer Integration
This article aims to guide users on the installation and configuration of external magnetometers for various applications. It focuses on the integration of magnetometers with sbgECom data.
For this example, we are using an Ellipse Micro as an external magnetometer to the Ekinox Micro.
You can learn more about magnetometers here.
Magnetometer Installation
The SBG Systems products are capable of receiving data from an external magnetometer to provide a heading, when a GNSS heading is not available.
The magnetometer should be installed as far away as possible from any magnetic source.
Ensure the AHRS/INS and the magnetometer are mounted rigidly on the same plane.
The magnetometer should have a right-handed reference frame. If you need to configure the orientation of the magnetometer in the SBG Systems product, this can be done in the software configuration below.
Electrical Installation
The AHRS/INS supports magnetometers with a transmit signal, to allow for calibration and to receive data from the magnetometer.
Typically the magnetometers consist of SDA or SDO pinouts for serial data.
If you're using a magnetometer with RS232 pinouts, you can just find the transmit and ground pins.
These pins can be used to connect to the input connection on the AHRS/INS. You can connect them accordingly by referring to the colour of the cable for the Main / Aux port on the AHRS/INS.
You can find this information in the hardware manual of your system.
Software Configuration
For this instance, we are using the Yellow wire and black wire (Port C RS232 RX) on the Aux connector as the connection to the Ekinox Micro.
Data going into the AHRS/INS must be in sbgECom format (SBG_ECOM_LOG_MAG (04)) described in our firmware manual.
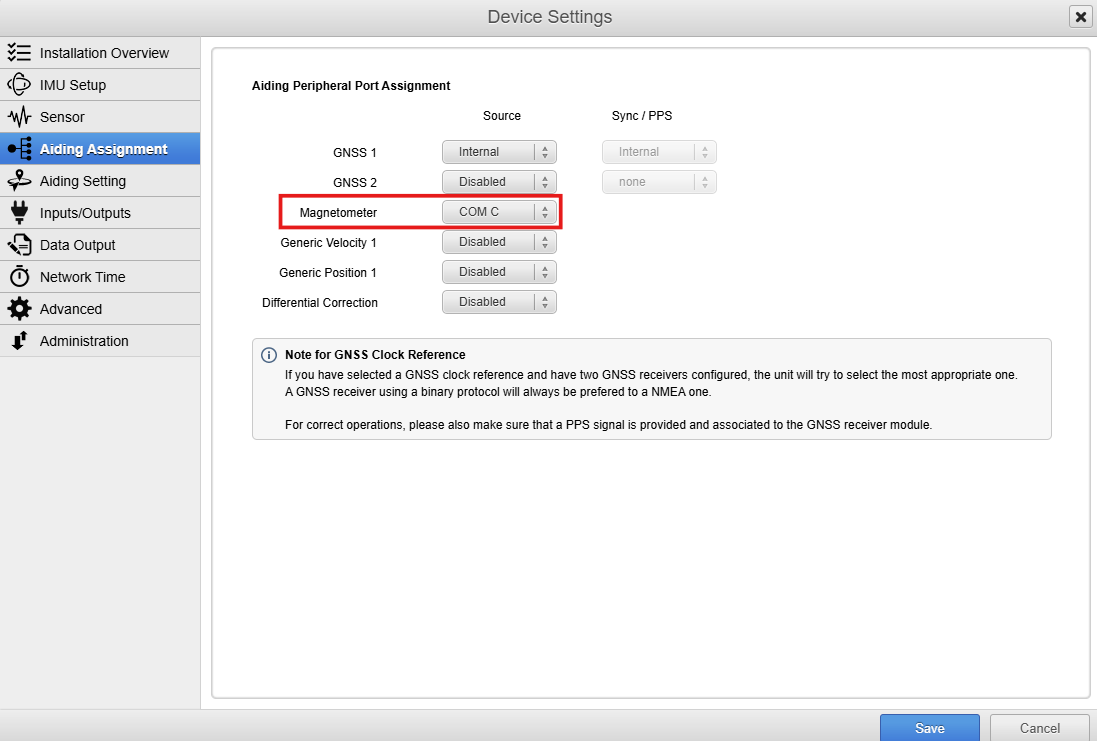
Aiding Assignment
You need to select the input port you wish to connect the magnetometer to (Port C in this instance).
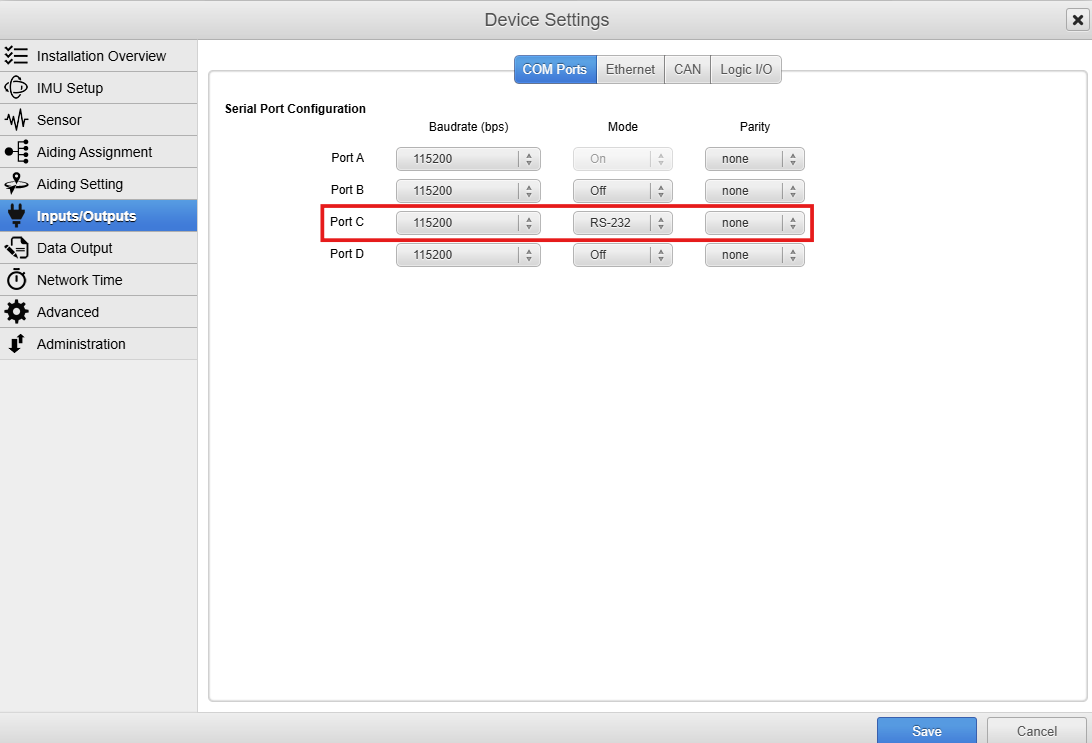
Input/Output
Ensure the correct baud rate and mode is selected for the corresponding serial port (In this instance we are using Port C with a baud rate of 115200 and using RS232).
Aiding Setting
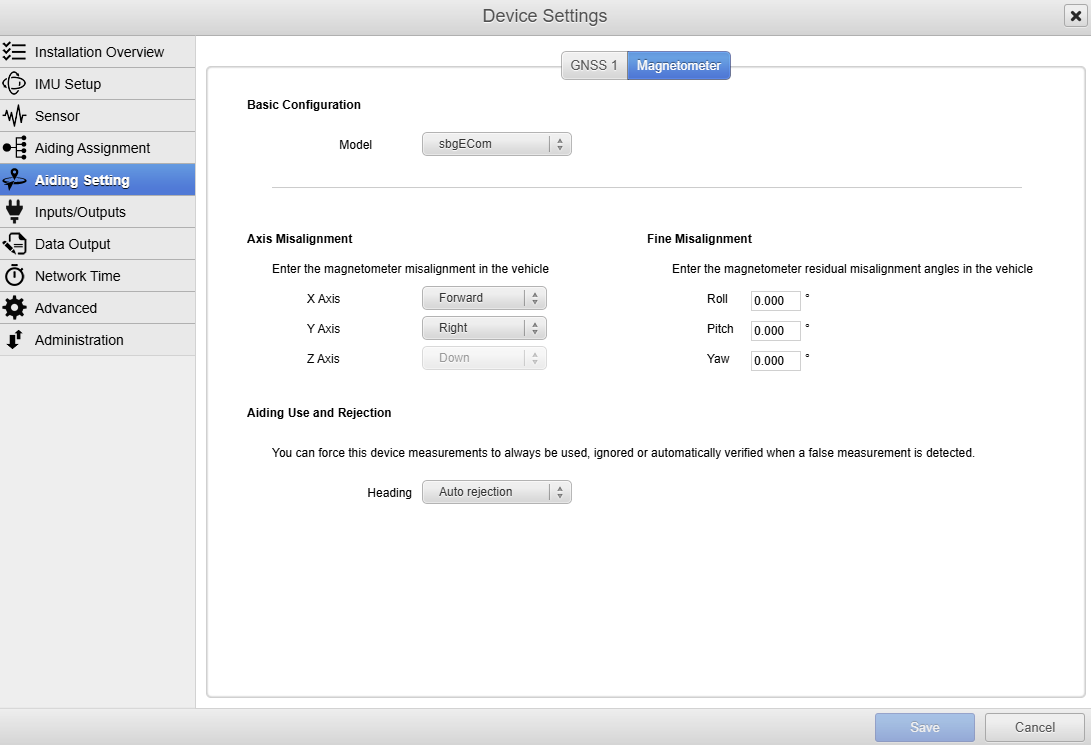
Misalignment
If the axis of the magnetometer cannot be aligned with the reference frame of the vehicle, you must enter the misalignment for the rough misalignment and the fine misalignment within 2°.
This is can also be done using using the Configuration API (sbgInsRestApi). A simple way to use this API on a Windows/Linux/Mac OS X computer is to use the command line tool sbgEcomApi.exe, provided on GitHub via port A, or Curl via Ethernet. We'll use the Curl commands here but you can refer to the Ellipse External Magnetometer integration article for the sbgEComApi commands.
curl -X POST http://<IPadress>/api/v1/settings/aiding/magnetometer/alignment/rough -d [\"backward\",\"left\"]
curl -X POST http://<IPadress>/api/v1/settings/aiding/magnetometer/alignment/fine -d [1,2,3]
Rejection Settings
Ensure the correct aiding rejection is selected (by default it will be Automatic).
- Automatic - The EKF automatically decides if the heading provided by the magnetometer is sufficiently accurate to be used in the solution.
- Never Accept - The EKF rejects all heading data from the magnetometer, will not be used in the solution.
- Always Accept - The EKF always uses the heading provided by the magnetometer in its solution.
As above, this can be done using the API command below for example.
curl -X POST http://<IPadress>/api/v1/settings/aiding/magnetometer/useMagData -d \"auto\"
Initial Position and Date
Configuring the initial position and date allows to automatically compensate the magnetic declination even before receiving a fix from the GNSS (if magnetometers are used) in order to output a true heading instead of a magnetic heading. Alternatively, the magnetic declination can be manually entered.
This is done using the Rest API too.
In order to correct for magnetic deviation when using magnetometers, two options are available:
- Using the embedded WMM: for that the initial position and date are required
- Using your own magnetic reference: in that case, you should configure the local magnetic field along the three axis
For the first option, you can use:
curl -X POST http://<IPadress>/api/v1/settings/localParam/useOnBoardWMM -d true
curl -X POST http://<IPadress>/api/v1/settings/localParam/latitude -d 48.8688
curl -X POST http://<IPadress>/api/v1/settings/localParam/longitude -d 2.1577
curl -X POST http://<IPadress>/api/v1/settings/localParam/height -d 30
curl -X POST http://<IPadress>/api/v1/settings/localParam/date -d \"2024-01-01\"
For the second option you can use:
curl -X POST http://<IPadress>/api/v1/settings/localParam/useOnBoardWMM -d false
curl -X POST http://<IPadress>/api/v1/settings/localParam/magneticRef -d [0.5,0.5,0.5]
Saving settings
By default, new settings are only applied in volatile memory. In order to save configuration for future use, you need to use a specific settings save command:
curl -X POST http://<IPadress>/api/v1/settings/save
Data Checking
Data Output
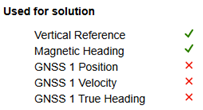
To check that the magnetometer is connected correctly and the data can be read, you can check the Aiding Inputs in the Information tab.
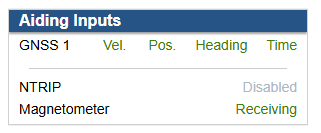
To ensure the magnetometer is connected and working as intended. You can check for the "Used in Solution" status in the Information tab.
Magnetometer Calibration
Using the Rest API
You can calibrate the magnetometers using the Rest API by using a few commands. The sbgInsRestApi documentation will have all the commands available. The syntax below is for the Windows command line interface, the syntax might change when using different operating systems or command line interfaces.
Starting a magnetic calibration
The Calibration Start command will allow you to start a calibration. Here we'll do a 3D calibration.
curl -X POST http://<IPadress>/api/v1/magnetometer/calibration/start -d "{\"mode\":\"3d\"}"
You will get the following response which means the calibration has started.
{"title":"request successful"}
Computing and returning the results of a magnetic calibration
The Calibration Get command will allow you to get the results from the ongoing calibration after having calibrated the system.
curl -X GET http://<IPadress>/api/v1/magnetometer/calibration
You will get something like this if the there was enough dynamics to compute a calibration.
{"status":"success","quality":"poor","trust":"high","maxNumPoints":1000,"numPointsTotal":2886,"numPointsUsed":776,"is2dCalibration":false,"enoughPts":true,"rollMotionValid":true,"pitchMotionValid":true,"yawMotionValid":true,"alignmentNumPtsTotal":334,"alignmentNumPtsUsed":231,"alignmentQuality":0.029893497005105019,"alignmentEnoughPts":true,"alignmentKeptEnoughPts":true,"hardIronCorrection":[-0.28149625658988953,0.081921949982643127,-0.22102254629135132],"softIronCorrection":[0.87645494937896729,-0.033238697797060013,-0.010048907250165939,-0.0034575869794934988,0.81990772485733032,-0.01065436378121376,0.010949188843369484,-0.01831500418484211,0.80841606855392456],"ellipsoidMatrix":[0.1577424556016922,0.76567554473876953,0.980593502521515,-0.32409319281578064,-0.89424312114715576,0.75038570165634155,1.0826467275619507,-0.3253452479839325,0.0798797756433487],"beforeMeanError":0.84757143259048462,"beforeStdError":4.2728862762451172,"beforeMaxError":42.917316436767578,"afterMeanError":0.097497910261154175,"afterStdError":4.4135284423828125,"afterMaxError":37.3183479309082,"meanAccuracy":0.00621096696704626,"stdAccuracy":0.049342647194862366,"maxAccuracy":0.36241316795349121}
Calibration results
Sending this command doesn't stop the calibration, it is still going in the background. You can send this command this multiple times until the results are satisfactory and you want to save them.
Setting the new calibration in the AHRS/INS
Once the results returned are satisfactory, you will need to set the calibration results to the product by sending the Hard Iron and Soft Iron corrections in a JSON format before saving the settings.
This is done with the Set Magnetometer Setup command.
curl -X POST http://<IPadress>/api/v1/settings/aiding/magnetometer -d "{\"hardIronCorrection\":[-0.28149625658988953,0.081921949982643127,-0.22102254629135132],\"softIronCorrection\":[0.87645494937896729,-0.033238697797060013,-0.010048907250165939,-0.0034575869794934988,0.81990772485733032,-0.01065436378121376,0.010949188843369484,-0.01831500418484211,0.80841606855392456]}"
You should get the following answer.
{"title":"request successful","needReboot":true}
Saving settings
By default, new settings are only applied in volatile memory. In order to save configuration for future use, you need to use a specific settings save command:
curl -X POST http://<IPadress>/api/v1/settings/save